Installing GenomeFace on Perlmutter with Mamba
Preliminaries
Your home folder on Perlmutter has a size limit of 40GB, but the $SCRATCH space allows you up to 20TB. GenomeFace requires about 4GB for package caching and an additional 10GB for the environment, so we'll be using the $SCRATCH directory for our installations.
Step 1: Installing Mamba
Mamba is a fast, robust package manager that is a near drop-in replacement for Conda. It is preferred over Conda due to its significantly faster performance, particularly when installing large packages and resolving dependencies. Its use is highly recommended.
If you don't have Mamba or Conda already installed, please execute the following commands to download and install Mamba:
# Download Miniforge installer (includes Mamba)
curl -L -o Mambaforge-Linux-x86_64.sh https://github.com/conda-forge/miniforge/releases/latest/download/Mambaforge-Linux-x86_64.sh
# Install Miniforge to your $SCRATCH directory
bash Mambaforge-Linux-x86_64.sh -b -p $SCRATCH/mambaforge

# Add Mamba to your PATH for the current session
export PATH=$SCRATCH/mambaforge/bin:$PATH

# Activate the base environment
mamba init

# Restart your shell or run the following
exec $SHELL
Step 2: Changing Mamba/Conda Package Cache Location
To change the package cache location, you'll need to modify your .condarc file or create one if it doesn't exist. This step ensures that packages are stored in $SCRATCH/pkgcache:
# make pkgcache directory
mkdir -p $SCRATCH/pkgcache
# Create or edit .condarc to update the package cache directory
echo "pkgs_dirs:
  - $SCRATCH/pkgcache" > ~/.condarc
Step 3: Create New Environment
Now, create a new environment specifically for GenomeFace with the prefix $SCRATCH/genomeface.
# Create the new environment
mamba create --prefix $SCRATCH/genomeface

# Activate the environment
mamba activate $SCRATCH/genomeface
Step 4: Install GenomeFace
With the environment activated, you can now install GenomeFace:
# Install GenomeFace
mamba install genomeface cuda-version=11.7 -c nvidia -c rapidsai -c conda-forge -c bioconda -c https://portal.nersc.gov/project/m1982/genomeface_repo
Or, for the experimental version w/ eukaroyte support:
mamba install genomeface cuda-version=11.7 -c nvidia -c rapidsai -c conda-forge -c bioconda -c https://portal.nersc.gov/project/m1982/genomeface_repo_euk
Using GenomeFace: Command-Line Options and Examples
Remember to reactivate your conda environment with mamba activate $SCRATCH/genomeface anytime you want to use it.
Help Message
If you need a quick reference or run into issues, you can always display the help message using the -h flag. This will also show the detected GPUs.
genomeface -h
usage: genomeface [-h] -i INPUT_FILE -a ABUNDANCE_FILE -g MARKERS_FILE -o OUTPUT_FOLDER
                     [-m MIN_CONTIG_LENGTH] [-p MIN_PURITY] [-s]

GenomeFace Prerelease
  - A next-generation tool for metagenomic binning, using deep learning and multi-GPU accelerated
clustering. Ideal for large-scale, real-world data.

The Exabiome Project (Lawrence Berkeley National Laboratory)
  - Contact rlettich@lbl.gov for issues or unexpected poor performance.

optional arguments:
  -h, --help            show this help message and exit
  -i INPUT_FILE         Input FASTA file containing metagenome assembly (optionally gzipped).
  -a ABUNDANCE_FILE     MetaBAT 2 style TSV file containing abundance data. Typically produced by
                        the `jgi_summarize_depths` or `coverm` programs.
  -g MARKERS_FILE       Input TSV file describing marker genes found on each contig. Can be
                        produced by the included `markersgf` program.
  -o OUTPUT_FOLDER      Output folder for writing bin FASTA files
  -m MIN_CONTIG_LENGTH  Minimum contig length to be considered for binning (default: 1500).
  -p MIN_PURITY         Minimum marker gene estimated % purity for selecting clusters for output.
                        Balances Precsion / Recall (default: 85)
  -s                    Specifies that the input FASTA is multiple single sample assemblies,
                        concatenated.

CUDA Devices (Clustering Acceleration):
  - Device 0: NVIDIA A100-PCIE-40GB

Tensorflow Enabled Devices (Neural Network Acceleration):
  - /physical_device:GPU:0

Notes:
  - By default, coassembly is assumed. For concatenated single-sample assemblies, use the [-s] flag.

Examples:
  genomeface -i coassembly.fa.gz -a abundance.tsv -g markers.tsv -o ./output
  genomeface -i concatenated_assemblies.fa.gz -a abundance.tsv -g markers.tsv -o ./output -s -m 1000
Output
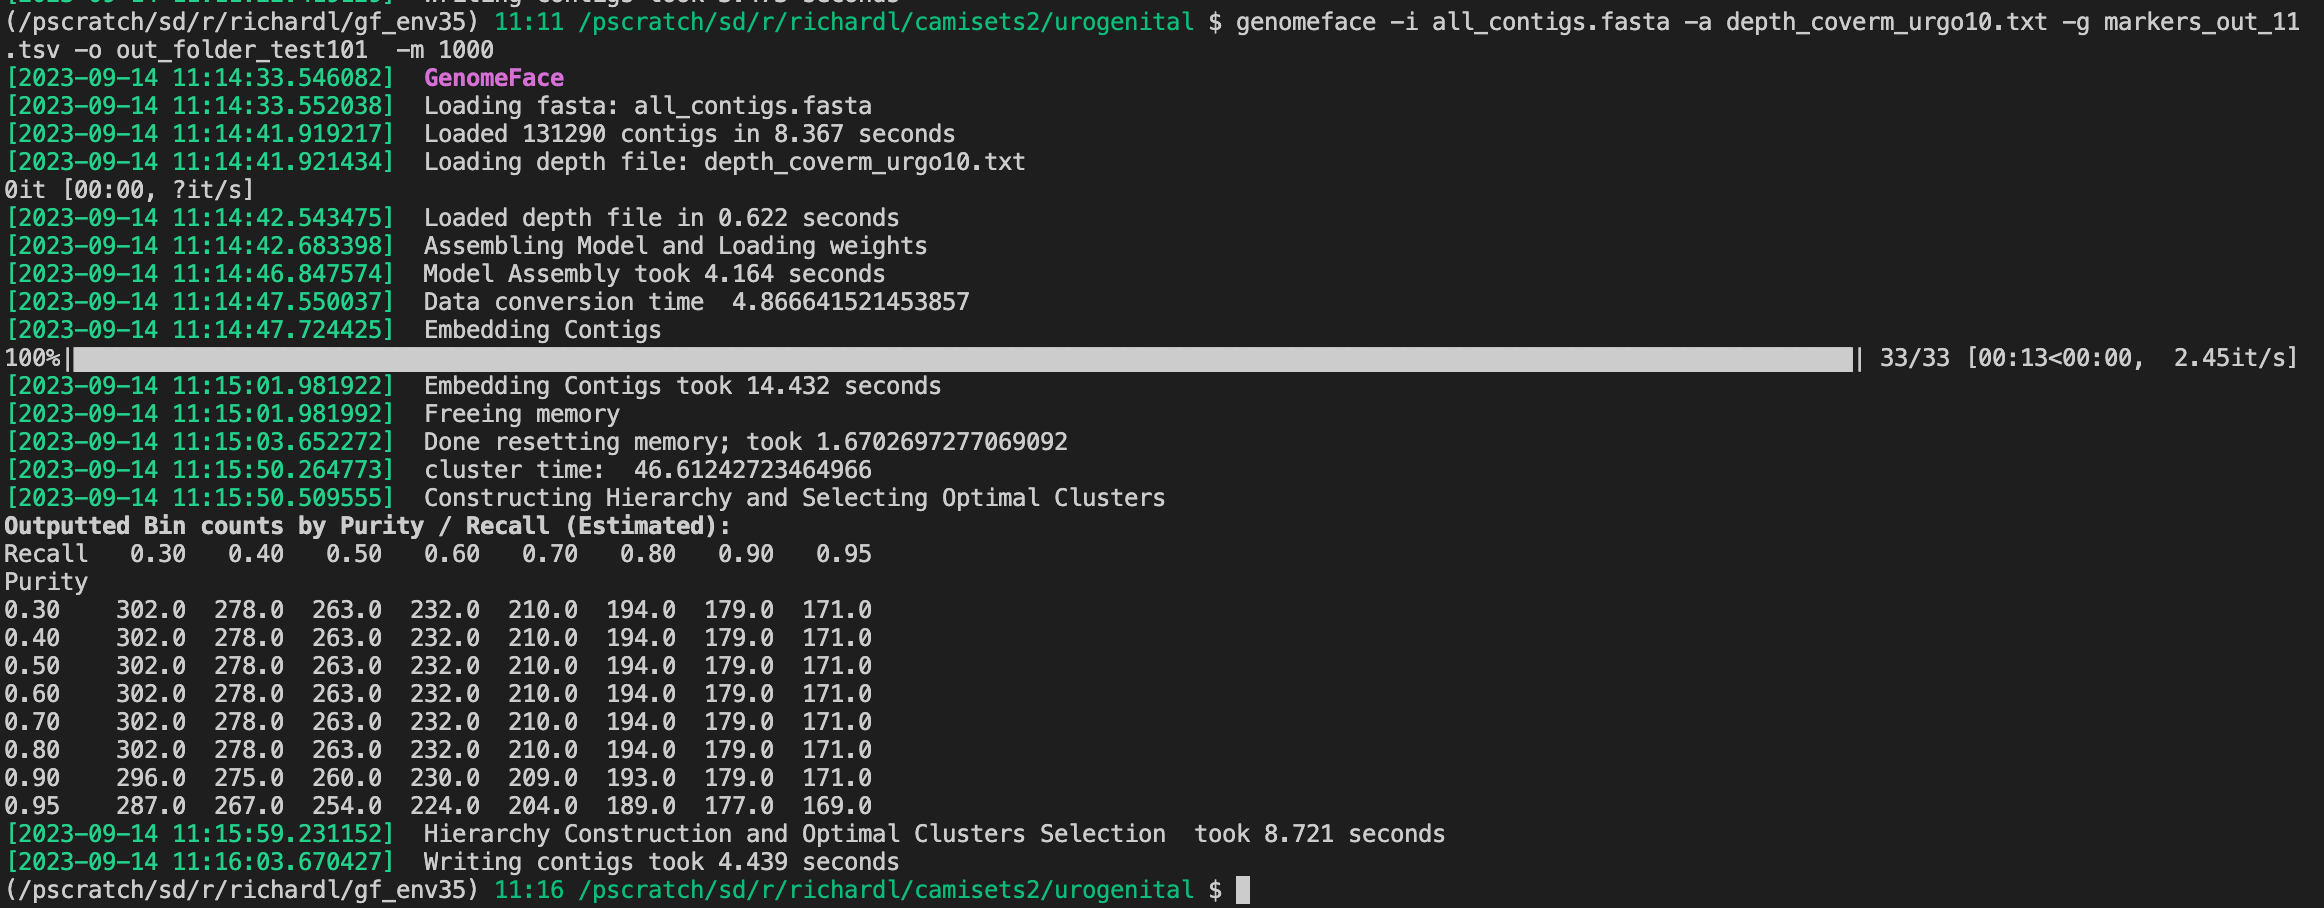
If all goes well, you should be able to run it, and see something like this: